
 Agencies
 Services
Scribble Signature
A Scribble Signature lets a user provide a handwritten signature on a form using a mouse, touchscreen, or stylus.
📋 Before you start: confirm you actually need a signature at all — see Do You Need a Signature?. Scribble Signature is appropriate for low-risk, internal approvals — not for anything legally required, which must go through Docusign or Adobe Sign instead.
Requires a Document of Record
Any form using Scribble Signature must have a Document of Record configured — the signature is captured onto the DoR PDF, not onto the web page itself. Scribble Signature works with either DoR option: Generate Document of Record (auto-generate) or a Form Templates-based DoR. This page covers both paths below.
Generate Document of Record Path
This is the simpler path — no XDP template or Forms Designer work required.
- Drag the Scribble Signature component onto the Adaptive Form the same way you'd add any other component.
- On the form file's properties, Form Model tab, set the Document of Record option to Generate Document of Record — see Document of Record for exactly where and how to set this.
That's it — the DoR is generated automatically and will include the captured signature. Skip ahead to Configure Submission below - the Form Templates walkthrough that follows doesn't apply when the Generate Document of Record Path is taken.
Form Templates Path
This Isn't a Standard Drag-and-Drop Component (Form Templates Path Only)
The Generate Document of Record path above is drag-and-drop, same as any other component. The Form Templates path is different: the field doesn't come from the Adaptive Form editor's component palette at all. It's an object from Adobe Forms Designer's Object Library, added while building an XDP form template — then pulled onto your Adaptive Form via the Data Sources panel.
Practically, this means:
- You need someone with Adobe Forms Designer experience to build the XDP. This is a specialized skill DoIT Web Services does not train authors on — see Document of Record for more on that gap.
- Your form's Form Model must be set to Form Templates, pointing at the XDP that contains the Signature Scribble field.
Step 1: Create the XDP in Adobe Forms Designer (Form Templates Path)
- Open Adobe Forms Designer and create a new form, or open an existing one you want to use.
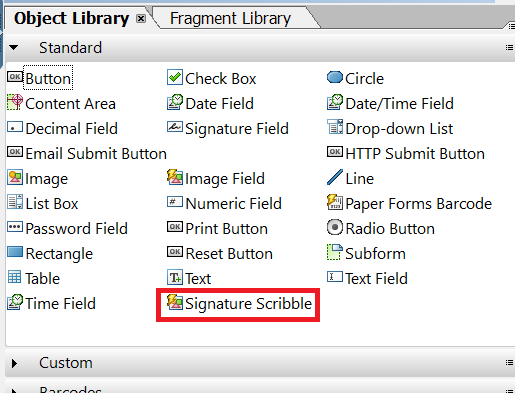
- From the Object Library, drag the fields you need onto the form — text fields, date fields, checkboxes, drop-downs, etc. If the Object Library isn't visible, open it via Window > Object Library; it appears on the right side of the workspace.
- In the Object Library, locate Signature Scribble, drag it onto the form, and place it where the user will sign.
- Give each interactive field a clear object name (e.g., EmployeeName, SignatureScribble).
- Set a clear title for the form in the XDP properties — AEM Forms & Documents may display this title instead of the XDP filename.
- Save the form as an XDP file (e.g., doit-enhancement-request-form.xdp).
Naming tip: use a simple XDP filename with letters, numbers, and hyphens. Avoid spaces.
Step 2: Upload the XDP to Forms & Documents
- Log in to the AEM Author environment.
- Open Forms > Forms & Documents.
- Open the agency folder where the template should be stored.
- Select Create > File Upload, choose your XDP file, and complete the upload.
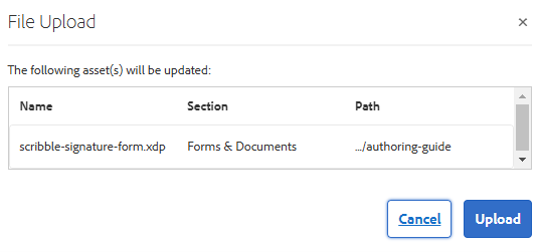
- Confirm the asset appears with Type set to Form Template.
Example repository path: /content/dam/formsanddocuments/authoring-guide/scribble-signature-form.xdp
Note: the Title column in Forms & Documents may show the form title stored in the XDP rather than the XDP filename — e.g., a file named scribble-signature-form.xdp may display as Contact Information if that's the title set in the XDP properties.

Step 3: Create an Adaptive Form Using the XDP Template
- In Forms > Forms & Documents, select Create > Adaptive Form.
- Choose the soiSharePoint Form Template.
- On the Basic tab, enter a Title and Name for the Adaptive Form.
- Open the Form Model tab. For Select From, choose Form Templates.
- Find and select your uploaded XDP. The list may show the XDP's form title rather than its filename — if the list doesn't populate immediately, wait a few moments.
- Create the Adaptive Form and open it in Edit mode.
Expected behavior: the new Adaptive Form may initially appear empty. The XDP provides the form's objects and bindings, but the fields still need to be added to the Adaptive Form layout — that's the next step.
Step 4: Add the XDP Fields to the Adaptive Form
- Open the Adaptive Form in Edit mode.
- Open Data Sources from the left sidebar.
- Expand the XDP hierarchy to view the fields created in Forms Designer.
- Drag the fields you need from Data Sources into the Root Panel. To add everything at once, drag the top-level object into the Root Panel.
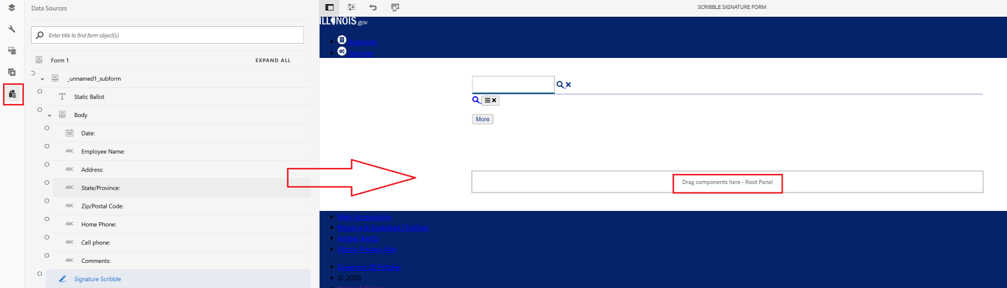
- Arrange the fields as needed, save the form, and use Preview to test the signature.
Result: the Adaptive Form is now based on the XDP template, and any fields you dragged in from Data Sources stay connected to the XDP's form objects.
Configure Submission (Both Paths)
Neither path above configures how the form actually submits — you still need to set that up before you can test it. On the Form Container's Submission tab, set the Submit Action the same way as any other form. See Form Configuration for the full walkthrough, and Pertinent Information to Submit to SharePoint List if this form submits to SharePoint.
Add the Adaptive Form to a Page (Both Paths)
Once the form is built and tested, add it to the page where users will access and submit it. See Utilizing a Form for that process — it's the same regardless of whether the form uses Signature Scribble.