Dynamic Media
Dynamic Media is a component that can be used for displaying videos or images, but is also the main method for displaying videos saved in the DAM.
A prerequisite is Authors will need videos or images that are saved in the DAM. When uploading videos to the DAM, there are a few considerations to keep in mind:
- Filename: Follow the Naming Convention Guide
- *Captions: Caption files MUST be created for ALL videos, and should NOT be burned into the video file. Rather, these should be included as a separate .vtt file. The WCM Team may be able to assist with their creation, if needed.
- *Upload Resolution: There is no need to upload a 4K video file, as a 1080p or 720p version will likely be sufficient for most user needs.
- *Maximum File Size: There is a maximum file size of 2GB for ALL Asset files.
- Processing: The larger the individual file uploaded, the longer AEM will take to process and encode the video file for use, so expect longer wait times before the file may be used in these scenarios.
- Dynamic Media Limitations: There are a few limitations to how Dynamic Media functions and a few browser + OS combinations that are not supported that AEM Authors should be mindful of.
*The WCM Team may be able to assist with the creation of .vtt caption files and reducing file sizes by appropriately compressing videos. If you need assistance, please reach out to us and we will assist you!
Uploading an asset to the DAM
- On the AEM author Home Screen, click on Assets.

- Click on Files.

Please note, that when adding a new video folder, it is important to configure that folder as follows:
- Video Profiles = Select "Adaptive Video Encoding"
It's important to do this before you add any videos to the folder.
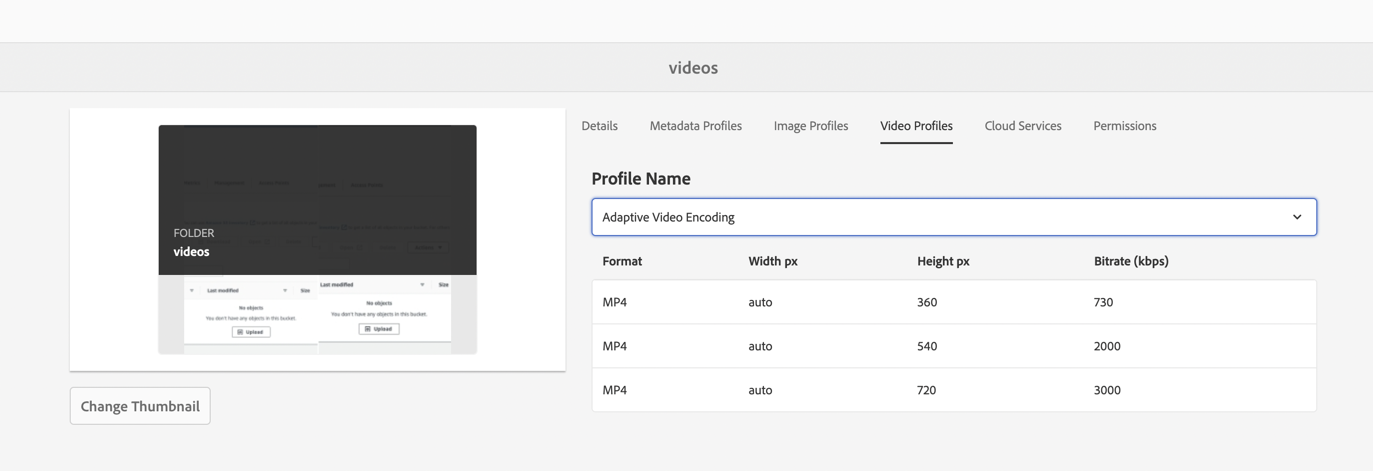
If you have uploaded videos into a folder before setting the Video Profile to "Adaptive Video Encoding" then you may find that videos will not play properly, or missing their thumbnails or other dynamic information. You can correct this by following one of these steps:
- Delete and reupload any video in the folder, or
- Alternately, you can run the following workflow against each video in the folder: "Workflow = Dynamic Media Encode Video"
*Note: If you already have video folders set up, you will only need to Select the correct path location. We highly recommend that you create a unique folder to store all your videos within.

- Click on the “Create” button and select “Files.”

- Select the file(s) to be uploaded to this location.
*Remember! There is a 2GB file-size limitation. Ensure all video files are under 2GB or you will receive an error when attempting to upload!

- Click on Upload.

- Select the file and click on "Properties"

- Update the asset's metadata such as title, description, and tags.

- Give a title for the component.
- Set width and height as needed.
Configuring the Dynamic Media tab
- Configure viewer modifiers as needed.
Adding captions to a Dynamic Media (video) file
- Upload the captions file (.vtt) to the location of your choice in the DAM and publish.
- Append the captions file location to "&caption=https://s7d1.scene7.com/is/content/isp/soi/en/web"
- Example: &caption=https://s7d1.scene7.com/is/content/isp/soi/en/web/web-standards/media/captions/test-captions.vtt
- Example - Captions Turned ON by Default:
&caption=https://s7d1.scene7.com/is/content/isp/soi/en/web/web-standards/media/captions/test-captions.vtt,1
- Replace "web-standards/media/captions/test-captions.vtt" with your caption file location.
- Open the page with the video file
- Open the Dynamic Media (or Dynamic Video) component dialog window and click on the Dynamic Media Settings tab
- Copy and paste the captions URL into the Viewer Modifiers field.

- Save the dialog field.
- A Closed Caption button now appears.
Example
Below is the video feed.