Event Template
Overview
The Event Template is designed for creating event pages that automatically display on Calendar components throughout your site and open into a full page of their own where more details can be viewed. This template ensures consistent formatting, proper metadata tagging, and seamless integration with your site's event management system.
Important: A planned future enhancement will include a global event calendar, on the main Illinois.gov website, that will aggregate and display events from all state agencies using AEM. Proper tagging of your events now will be extremely beneficial, when this feature launches, as it will ensure your agency's events are correctly categorized, searchable, and discoverable by the public across the entire state government web presence.
Use the Event Template for:
- Conferences, workshops, and seminars
- Public meetings and hearings
- Community events and outreach programs
- Training sessions and educational events
- Webinars and virtual events
- Any time-specific activity that should appear on your site's calendar
For detailed instructions on navigating AEM and creating new pages, refer to the Creating a New Page guide.
When creating an event page, navigate to your agency's events section and select the Event Template.
Every site should have a dedicated calendar section for storing all event pages. This ensures proper organization and enables the calendar component to function correctly.The path should resemble:
- /content/soi/[Your agency's acronym]/en/events
After selecting the Event Template, you'll be presented with a properties dialog with three tabs: Basic, Advanced, and Event. Fields marked with an asterisk (*) are required.
Basic Tab

- Title* - Use a standardized naming convention for the Title field
- Standardized Format: YYYYMMDD-Event Name for Agencies without boards or committees:
- Start with the event date in European format (YYYYMMDD without hyphens in the date)
- Add a single hyphen, then the event name
- Remove special characters and punctuation
- Examples:
- For "Annual Budget Public Hearing" on September 19, 2025: 20250919-Annual Budget Public Hearing
- For Committee/Board Events: YYYYMMDD-Committee Name-Event Name:
- Include the committee or board name between the date and event name
- Use this format when your agency hosts multiple events on the same day
- Helps distinguish between different organizing bodies
- Examples:
- For a Review Committee meeting: 20250919-Review Committee-Budget Hearing
- Benefits of this naming convention:
- Creates SEO-friendly URLs
- Enables chronological sorting in content management
- Prevents naming conflicts for same-day events
- Makes it easier to locate specific events in the system
- Standardized Format: YYYYMMDD-Event Name for Agencies without boards or committees:
- Name - This field auto-populates based on the Title field. The system will automatically replace any spaces in the Title with dashes. Generally should not be modified unless you need a different URL structure.
Event Tab
All fields in the Event tab provide the content and metadata that power your event display and calendar integration.
- Event Title* - Enter a clear, descriptive title for the event
- This will appear as the page title and in calendar listings. Include key terms people may search for.
- A date can be added to the end of the title to make it unique on the site page/calendar component
- Agency* - Select your agency's acronym tag from /State of Illinois/ILGAgency
- This ensures the event appears in your agency's event feeds and will be crucial for the future global calendar
- Event Type* - Select the appropriate event type (e.g., "Public Meeting", "Training", "Conference")
- Click the folder icon to browse tags
- Navigate to: /State of Illinois/ILGAgency/[Your agency's acronym]/Events Type
- If you don't see appropriate tags, contact your site administrator
- This tag determines which events appear together in "Upcoming Events" components
- State Level Category - Select relevant content categories that describe your event's topic
- Click the folder icon to browse tags
- Navigate to: /State of Illinois/Content Category
- Multiple categories can be selected if applicable
- This will be important for categorization in the future global calendar
- Image - Select an image that represents your event to display on the full event page
- Recommended size: 1200x630 pixels
- Ensure you have proper rights to use the image
- Image Alt Text - Provide descriptive alternative text for the main event image for accessibility and screen readers
- Describe what's shown in the image, not just "event image"
- Thumbnail - Select or upload a smaller image for use in calendar feeds and event summary components
- Recommended size: 400x300 pixels
- Can be the same as the main image or a cropped version
- Thumbnail Alt Text - Provide descriptive alternative text for the thumbnail image for accessibility
 Event Page Properties after Initial Creation include the 3 fields indicated by red arrows
- Description - Write a compelling description that explains what the event is about
- Include key details like agenda highlights, target audience, or special requirements
- This text appears in event listings and search results
- Keep it concise but informative (2-3 sentences recommended)
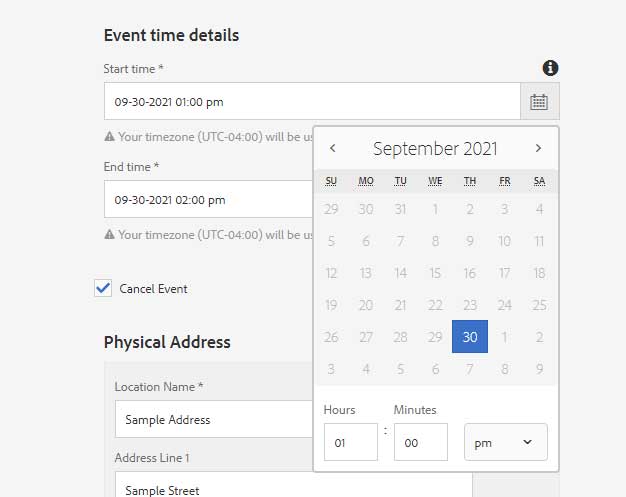
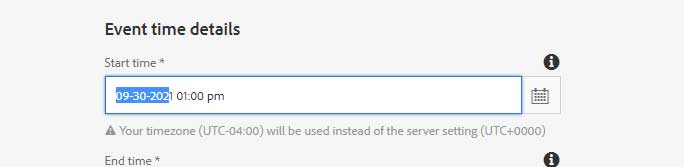
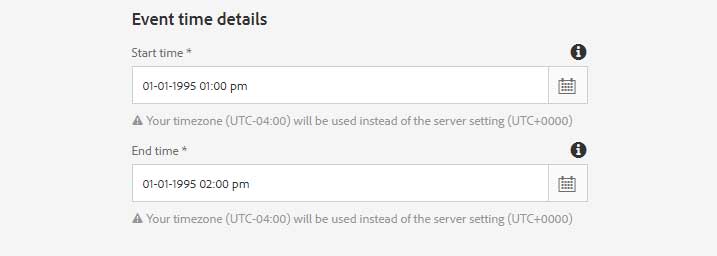
- Start Date/Time* - Select the start date and time for your event
- Critical: Always use the date picker (calendar icon) to select dates and times
- If you don't use the date picker, the event may display incorrectly in navigation and feeds
- Critical: Always use the date picker (calendar icon) to select dates and times
- End Date/Time* - Select the end date and time for your event
- Critical: Always use the date picker (calendar icon) to select dates and times
- Both dates MUST be on the same day
- Critical: Always use the date picker (calendar icon) to select dates and times
- Cancel Event - When checked, updates html markup to display this specific event as cancelled
- Only viewable after initial Event page creation
- Once cancelled, the Event will display with red, strikethrough "cancelled" text (CANCELLED) on Calendars, Event Feeds, and on the actual Event Detail Page
- Physical Address - For in-person events, complete the physical location fields for up to 3 physical locations:
- Location Name* (Required for physical events) - Enter the name of the venue or building
- Example: "State Transportation Building" or "Springfield Community Center"
- Address Line 1 - Street address of the venue
- Example: "2300 S Dirksen Pkwy"
- Address Line 2 - Additional address information (suite, room number, etc.)
- Example: "Room 100" or "Suite 200"
- City, State, Zipcode - Complete address information
- Latitude, Longitude - Optional coordinates to 6 decimal places for precise mapping
- Can be left blank if don't want map location on Event page
- Display map on page - When checked, enables a map on the Event detail page that takes in the supplied Latitude and Longitude values to map the location with a pin
- Only viewable after initial Event page creation
- Location Name* (Required for physical events) - Enter the name of the venue or building
- Virtual Address - For online or hybrid events, complete the virtual location fields for up to 3 virtual locations:
- Location Name* (Required for virtual events) - Name of the virtual platform or meeting space
- Example: "Zoom Webinar" or "Microsoft Teams Meeting"
- Description - Additional details about accessing the virtual event
- Example: "Meeting link will be sent to registered participants"
- Link - Direct URL to join the virtual event (if available at time of creation)
- Can be updated closer to the event date
- Additional Information - RTE field to add any additional information to the Event
- Only viewable after initial Event page creation
- Location Name* (Required for virtual events) - Name of the virtual platform or meeting space
- Event Assets - Link to related documents, registration forms, or additional resources to the Event. Displays in modal popup on Calendar component, in Event Feed listings, and on the Event Detail page:
- Asset or Page to Link - Select a document from AEM's asset library or link to another page
- Common examples: registration forms, agendas, minutes, presentation materials
- Link Label - Display text for the link
- Example: "Register for Event" or "Download Agenda"
- Link Aria Label - Accessibility label for screen readers
- Should be descriptive of what the link does
- Example: "Register for the Annual Budget Public Hearing"
- Asset or Page to Link - Select a document from AEM's asset library or link to another page
After Page Creation
Once you click "Create", your event page will be generated with the following components automatically included:
Non-Editable Components
- Global Header - Managed centrally through experience fragments
- Agency Header - Controlled from site's homepage
- Agency Footer - Controlled from site's homepage
- Global Footer - Managed centrally through experience fragments
Editable Components
- Breadcrumb - Automatically shows the navigation path to your event
- Usually requires no modification
- Spacer - Provides consistent spacing between page elements
- Typically no changes needed
- Upcoming Events - Automatically displays the 4 nearest future events with the same event type
- Pulls from events across your site with matching event type tags
- If no events are found, displays a customizable "No upcoming events" message
- Title - Displays your event title as entered in the page properties
- Generally should not be modified
- Events - The main content area that displays all your event details
- Automatically populated from the Event tab properties you filled out
- Shows event title, date, time, location, description, and images
- Usually requires no additional editing, but if edits are needed will need to be done in the page properties
Adding Additional Content

After the default components, you can add various components to the Event page, within the last container component on the content tree, to provide additional information pertinent to the event, download forms or materials, show photo galleries, or more.
Publishing the Event
After creating and reviewing your event page:
- Use the View as Published function to see how it will appear to the public
- Check that all information is accurate and properly formatted
- Verify images display correctly and load quickly
- Follow appropriate steps to publish the page
- Test that the event appears in your site's calendar components
Remember that published events will automatically appear in relevant calendar feeds across your site based on the tags and categories you've selected.
Advanced Tips & Best Practices
Date & Time Entry Best Practices
Don't forget to use the Date Picker (Calendar icon) to select both the Start and End Times. If you don't use the Date Picker, the platform may display the incorrect Event Date in the Upcoming Events list.
Using the Date Picker
Always use the calendar icon to select dates. This ensures:
- Proper formatting in the system
- Correct display in navigation elements
- Accurate sorting in event feeds
- Proper integration with calendar components
Military Time Entry
Military time, or 24 hour time, can be used when entering an event's time. This will not be shown to the end user. All times shown to the public are in traditional AM/PM times.
- First select any time using the date picker (including AM/PM)
- Click directly on the time text field
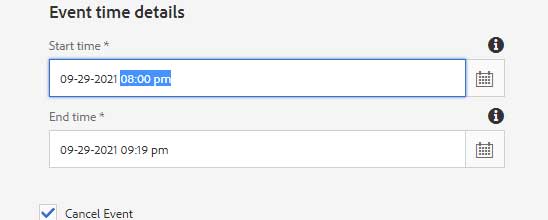
- Type the 4-digit military time (e.g., "1400" for 2:00 PM)
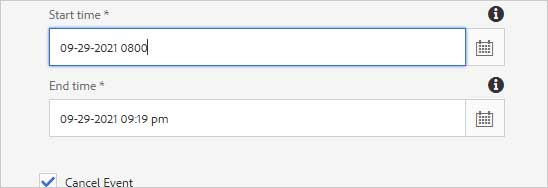
- Tab out of the field to see it convert to standard AM/PM format

Adding Past Events
To create an event page for a past event (for archival purposes):
- Follow normal Event page creation steps
- When selecting the start date, the picker will prevent past dates
- Select today's date in the date picker first
- Click directly on the date text field
- Manually edit the date to your desired past date
- Repeat for the end date
- The system will accept the manually entered past dates
Examples
Troubleshooting
Event Not Appearing in Calendar Feeds
Problem: Your event doesn't show up in calendar components on other pages.
Solutions:
- Verify you used the date picker for start and end times
- Check that your event type tag is correctly selected for both the event page and the calendar component
- Ensure the event date is in the future (for upcoming events components)
- Confirm the page is published, not just created
Incorrect Date Display
Problem: Event shows wrong date in navigation or feeds.
Solutions:
- Always use the date picker instead of manually typing dates initially
- If you must enter past dates, use the workaround method described above
- Check that start and end times are both properly formatted
Missing Event Type Tags
Problem: Can't find appropriate event type tags when creating an event.
Solutions:
- Verify you're looking in the correct path:
- /State of Illinois/ILGAgency/[Your agency's acronym]/Event Types
- Contact your site administrator to create missing tags